A dry place to sleep
No more wet, messy blankets
Goodnight sweet puppy

I’d like to say hi
But I’m a bit overwhelmed
Quiet time will help me
Lots of hours in here
Delayed gratification
Helps my mind engage
Perched on my lookout
Or while snuggled down below
I love my bunk bed
Sometimes I need to
Recharge just like the hoomans do
I’ll be with you soon
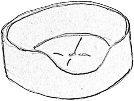
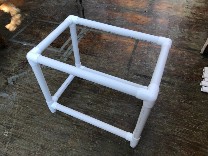
Dog bed
- Time: 1 hr
- Cost: $30
- Skill Level: Medium
Loads of laundry because a pupper tipped over his water bowl and got the bedding wet? A bed that is even just slightly off the floor does wonders for the comfort of the dogs in your care and helps keep their area tidy. This bed is perfect for pooches to snuggle up on off the floor, and it will help to keep bedding clean and dry. Win-win!
The finished product measures approximately 30” long, 20” deep and sits a few inches off the ground. Adjustments can easily be made by changing the dimensions to fit your dog housing needs (read through to the end for modifications). Maximize the length of the bed when you can and try not to make it much skinnier as dogs need space to lie comfortably.
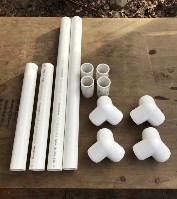
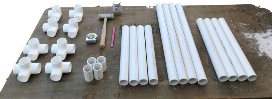
Materials:
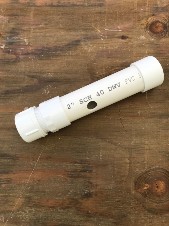
- 1- 10 foot, 1.5” PVC Pipe – Schedule 40 (preferred)
- 4- 1.5” PVC- 3 way corners (furniture grade is fine)
- 4- 1.5” PVC Slip on end cap if desired
- Saw to cut the PVC
- Clear PVC glue
- 1 yard of 18 oz coated vinyl
- H66 glue for the vinyl
- Sharpie
- Paper towel
- PPE – safety glasses, hearing protection, latex gloves
- Old tablecloth (to protect surfaces)
- Tape measure, heavy duty scissors
Making the bed frame:
- Cut the PVC to the following lengths:
- 2 pieces, 16 inches long (bed width)
- 2 pieces, 26 inches long (bed length)
- 4 pieces, 3 inches long (legs)
- Attach the legs and glue. Glue the 3″ legs into place- one into each of the four 4 way connectors. To prevent uneven lengths, make sure to insert to their stop point inside the fitting. (Pro tip: Apply glue to both the end of the leg and the 3-way, twist the leg as it is inserted. Wipe away any excess glue.)
- Assemble the bed frame. Gluing the rest of the bed is optional. Once added, the vinyl part of the bed will add structural support. If the kennel floor is uneven, gluing is not recommended.
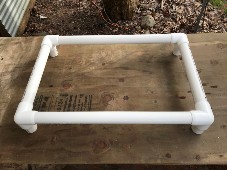
PVC glue dries very fast. If you do want to glue everything together- because more is more!- be sure to get it squared up to the floor so the bed doesn’t wobble. If not gluing, simply insert the remaining pieces to make the bed frame.
End caps: If desired, an end cap can be added to the feet of the bed. This is recommended but not 100% necessary. Adding end caps will help make them easier to clean.
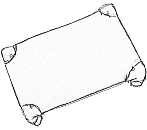
Making the vinyl bed:
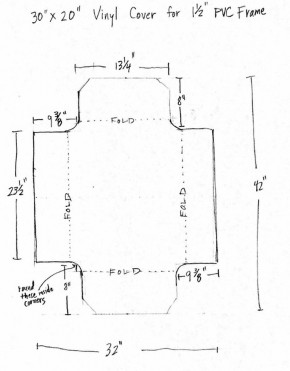
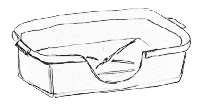
- Make the template. Use this drawing to make a pattern that can be traced onto vinyl fabric. The template provided is for the 30” x 20” frame bed. If you want to make different sizes, scroll to the bottom for instructions on customizing your beds.
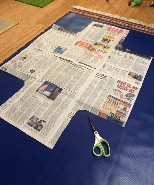
If you are going to make more than one, do yourself a favor and make a cardboard template. - Cut out a bed. Lay the vinyl fabric flat with the rough side up and trace the pattern with a Sharpie. Then cut it out.
Attaching the vinyl bed to the frame:
- Place the PVC frame upside down onto the cut out vinyl bed. Cover the table to protect the surface. Lay the vinyl material right side down (smooth side down) on the floor or work table, leave rough side facing up. Place the PVC bed frame onto the vinyl with the feet facing up. Center the frame over the vinyl bed.
- Begin to glue flaps. Easiest to do one flap at a time: Apply a 1” strip of glue along the outside edge of the vinyl for the entire length. Try not to get glue onto the PVC frame – if this happens wipe it off with some paper towel. Fold the vinyl flap over the PVC towards the inside (don’t make it too tight), keeping the flap parallel to the frame. Use your finger to hold flap in place while the glue dries – about 1 minute. Rub the entire glued surface to keep glue in contact with the vinyl surfaces. After about 1-2 minutes glue will hold on its own and the next vinyl flap can be glued. Repeat this for all bed sides.
- Check your work. Check the previous glued flaps- look for areas that aren’t holding and reapply glue and hold in place. The flaps need to be well glued to insure the bed will hold up for shelter use – do a fantastically good job gluing and this bed should last.
Wait a day for glue to fully cure before you put the bed to use.
Modifications:
To make other size beds either shorten or lengthen the PVC pieces for the bed width or bed length.
If you want a 33” long bed, that is 3” longer than the current model, add 3” to the bed lengths PVC piece , so 26” + 3” = 29”, you will need a 29” piece of PVC to make a 33” long bed for the long side.
If you want a 25” long bed, that is 5” shorter than this 30” bed so you would minus 5” from the 26” length and you would need a 21” piece of PVC for a 25” bed.
Same goes for any changes in the bed width. Double check your math and your bed size needs. Also if you are going to be making a number of beds…build a complete one first to make sure it is actually the size you want/need. Then go and cut your materials for the others…this will make your day of bed assembly fun and save you a trip to the store to buy additional materials…just saying – not that I have ever done this.
If you make a frame size other than 30” x 20” frame and need to adjust the vinyl bed pattern, simply add or subtract length or width to the pattern. If you make a 35” x 22” frame, add 5” to the length and 2” to the width of the pattern (do this from the center).
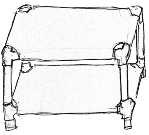
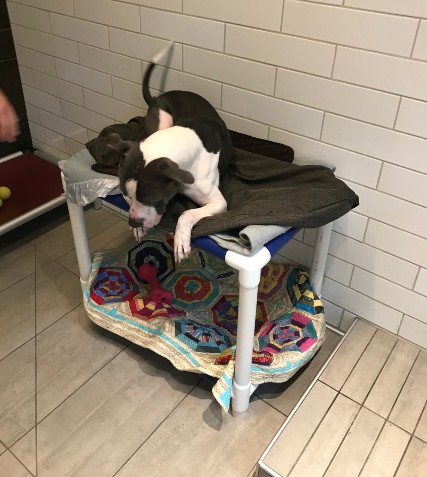
Double decker dog bed
- Time: 1 hr
- Cost: $65
- Skill Level: Medium
A lookout perch above, or a snuggly bed below, this double decker give dogs choice while keeping blankets dry and clean.
Materials:
- PVC Pipe:
- 3 – 1.5 inch, 10′ PVC pipe
- Fittings:
- 4 – 1.5 inch 3 way fittings
- 4 – 1.5 inch 4 way fittings
- 2 yards of 18 oz coated vinyl
- PPE materials: safety glasses, hearing protection (if using power tools- or if you are working with someone talkative), latex gloves as needed for gluing, and a little common sense
- Hand saw or power saw to cut PVC
- A mallet is handy for assembly
- Tape measure
- Heavy duty scissors
- Sharpie to mark PVC and vinyl
- H66 glue
- Clear PVC glue
Directions:
1. Cut PVC to the following lengths:
- 4 – pieces: 16 inches long (bed width)
- 4 – 26 inches long (bed length)
- 4 – 18 inches for the risers
- 4 – 3 inch pieces for the legs
2. Assemble the bed frame. Assemble the entire frame so that it is clear as to how it will fit together. Put the risers aside for now (the 18 inch PVC pieces) and work with the two beds first. Make the lower bed using the 4-way fittings and make the upper bed with the 3-way fittings.
Note: You can choose to glue the bed or not. I glue the short legs into the lower bunk, then may or may not glue the bed frames. I usually do not glue the risers so that the beds can be separated, making them easier to move and clean.
When gluing PVC fittings: cover the gluing surface inside the fitting entirely and quickly, with as little glue as possible – then assemble. If you only cover some of the fitting surface the pipe will not slide fully in. A mallet is a good backup and should be handy to insure pipe and fittings cooperate. Don’t whack it too hard or the fitting might break
Making the vinyl beds:
- Make a template. Use the vinyl template provided in the (single stack) Dog Bed instructions above.
- Cut out a bed. Lay the vinyl fabric flat with the rough side up and trace two patterns. Mark with a Sharpie where the folded sides will be glued. Cut both beds out.
Attaching the vinyl beds to the bed frames:
- Place the PVC frame upside down onto the cut out vinyl bed. Cover the table to protect the surface. Lay the vinyl material right side down (smooth side down) on the floor or work table, leave rough side facing up. Place the PVC bed frame onto the vinyl with the feet facing up. Center the frame over the vinyl bed.
- Begin to glue flaps. Easiest to do one flap at a time, one bed at a time. Apply a 1” strip of glue along the outside edge of the vinyl for the entire length. Try not to get glue onto the PVC frame – if this happens wipe it off with some paper towel. Fold the vinyl flap over the PVC towards the inside (don’t make it too tight); keep the flap parallel to the frame and line up with the Sharpie marks. Use your finger to hold flap in place while the glue dries – about 1 minute. Rub the entire glued surface to keep glue in contact with the vinyl surfaces. After about 1-2 minutes glue will hold on its own and the next vinyl flap can be glued. Repeat this for all bed sides. Repeat for the second bed.
- Check your work. Check the previous glued flaps looking for areas that aren’t holding. Reapply glue and hold in place as needed.
- Turn the two beds into a bunk bed. Place the bottom bed right side up, add the risers and then add the top bunk. Push together so they are nice and tight.
Note: If you need to get the beds apart, put your foot on the bottom bed frame and pull on the top one. You may need to go around the bed as you pull to loosen up, but eventually they’ll come apart.
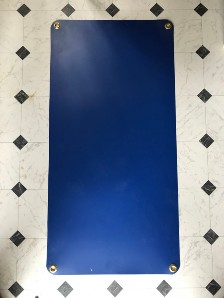
Dog curtailment
- Time: 15 minutes
- Cost: $10
- Skill level: Easyish
How many times have you heard this advice: Feeling stressed? Take a little break. A quick time out can relieve stress and recharge your batteries. Guess what? It works for animals and humans alike. Providing the option to retreat or to engage reduces stress and illness in animals in the shelter environment.
We recommend no more than half (side to side) the kennel front be covered with a panel and it needs to be only 36-48” tall. The example shown here is 18 x 36 inches so this will fit a 36” or wider door.
Materials:
- 1/37th inch HDPE Panels (High Density Polyethylene)
- – These come in assorted colors and can be found at TAP Plastics and likely other places for ~$9 for a 2 foot by 4 foot sheet.
- PPE – safety glasses, hearing protection, gloves
- Good scissors to cut the panel
- Sharpie
- 4- ½ inch brass grommets and grommet kit
- Carabiners or Zip Ties
- What size door? Determine panel size that works with your kennel door and trace to that size on the vinyl with Sharpie.
- Cut. Using scissors, cut the panel out of the vinyl fabric.
- Round the edges. An easy way to do this is by using a drinking cup to trace the rounded edges on the four corners.
- Poke 4 holes. Poke holes in all four corners and insert brass grommets.
- Mount. Use zip ties or carabiners to attach to kennel doors.
Treat-dispensing PVC dog toy
- Cost: Less than $10.00
- Time: about 10 minutes
- Skill Level: Easy
What do dogs love more than eating dinner? Getting food, enrichment, mental stimulation and play all at the same time! Not to mention, you are stretching out the fun (getting treats!) and delaying gratification.
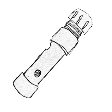
Materials:
- PVC pipe (Your choice: 1″, 1.5″, 2″)
- A pair of adapter/screw caps. The adapters and screw caps come in male or female. Either will work; just make sure you have the a pair (i.e., a female adaptor with male screw cap, or a male adaptor with female screw cap).
- Note: We do not recommend ABS pipe (black pipe). It’s more brittle than PVC.
- Slip cap – for the non-opening end
- PPE – safety glasses, hearing protection, gloves
- Saw to cut PVC – hand saw, miter saw, etc.
- Power drill
- Drill bit the size you want the food dispensing holes to be
- Clear PVC glue
- Small piece of sandpaper
Determine the size(s) of toy wanted and purchase the corresponding PVC pipe size.
- 1” for small pipe diameter toys
- 1.5” for medium diameter toys
- 2” for large pipe diameter toys
Directions:
- Cut. Cut the PVC pipe to desired length:
~ 4” for small pipe diameter toys (using 1” pipe)
~ 6” for medium diameter toys (using 1.5″ pipe)
~ 8” for large pipe diameter toys (using 2″ pipe) - Glue. Using PVC glue attach the slip cap to one end of the pipe.
- Glue some more. Using PVC glue attach the male adapter to the other end.
- Screw. Screw cap onto male adapter.
- Drill. Drill holes into PVC pipe where desired. You could drill the holes first, but it’s easier to see locations for drilling after the toy is made.
- Sand. Remove the PVC burrs along the cut edges and sand the edges of the holes.
- Rinse it out. Empty out PVC filings from drilling out the holes and wash toy.
- Give. Give it to a pup and watch their tail wag.

Although these toys are very durable, breakage may occur – always monitor before and after use.
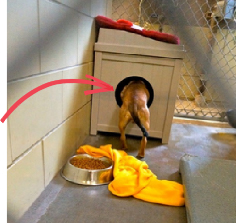
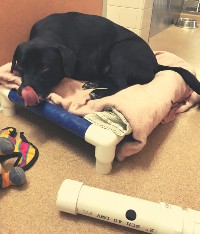
Dog retreat space
- Time: 10-15 minutes
- Cost: $10.00 – 20.00
- Skill level: Easy
Some of our new friends might benefit from feeling a bit more protected while we get to know each other. Converted storage containers make excellent retreat spaces for smaller dogs, and they are super durable. Bonus: They are usually easier to clean than a crate or carrier (but those will work too).
Materials:
- Plastic storage container
- Sharpie
- Skill saw
- Drill and drill bit (big enough to make a hole for the saw blade)
These can be made from storage containers of varying sizes. The one shown here was made with a recycle bin and was quite tall. The height allowed enough space for a hole to be cut and a small dog to enter and exit from one end of the container. The plastic of this bin is more firm then flexible, which helps maintain its shape.
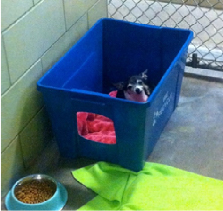
With bins that are lower in height – where a pass-through would not fit – you could alternatively remove a scoop.
For larger dogs, drill and sand a hole into the side of a deck box and you’ll have one happy Pete! Make sure to drill the hole higher than the bedding so blankets stay inside the container, dry and tidy.